You notice it one random Tuesday morning, half awake, toothbrush still in your mouth. The toilet seat that used to be a clean, soft white is now… not. A tired shade of yellow that no amount of quick wiping seems to change. You stare at it, slightly disgusted, slightly defeated, wondering when exactly it crossed the line from “used” to “embarrassing”.
Guests are coming this weekend. You’ve already scrubbed the sink, changed the towels, lit the nice candle. But that yellowed toilet seat gives away a story you don’t want anyone to read.
There’s a quiet frustration in that moment.
Because what no one tells you is that the solution is often hiding in the back of your cleaning cupboard, in a bottle you don’t even look at anymore.
The mystery of the yellowed toilet seat
The thing about yellowed toilet seats is that they make a clean bathroom look dirty, instantly. You can have gleaming tiles and spotless mirrors, yet that faint nicotine-like stain around the edges of the seat ruins the whole picture.
You wipe, you scrub, you change products. Nothing really moves. You start to wonder if the plastic itself has aged, if you’re fighting time rather than dirt. And you’re almost resigned to the idea that the only solution is to buy a new seat altogether.
One woman I spoke to – a young mum in a small city apartment – told me she’d tried everything from thick bleach gels to expensive “whitening” bathroom foams. She left them to sit for hours, followed all the little hacks scattered around social media.
The result? A slightly brighter smell, a sore arm from scrubbing, and the same pale yellow ring staring back at her. She was two clicks away from ordering a brand-new seat online when her grandmother casually mentioned the old bottle under the sink that “used to fix that in one go”.
Here’s the part that surprises most people: that yellow shade isn’t always deep dirt. On many plastic toilet seats, it’s a mix of tiny mineral deposits, old cleaning product residue and micro-oxidation from time, heat and splashes. Bleach often makes it worse, setting the stain rather than lifting it.
So you pour stronger and stronger chemicals, expecting a miracle, while the real hero is gentler, older, and probably already in your home. It’s less about aggression. More about chemistry.
➡️ Switzerland has quietly built a massive underground network by tunneling for 30 years
➡️ The forgotten kitchen liquid that effortlessly turns grimy cabinets smooth, clean, and shiny again
➡️ Rodents flee instantly: the overlooked staple that drives rats away without traps
The forgotten bathroom liquid that quietly works miracles
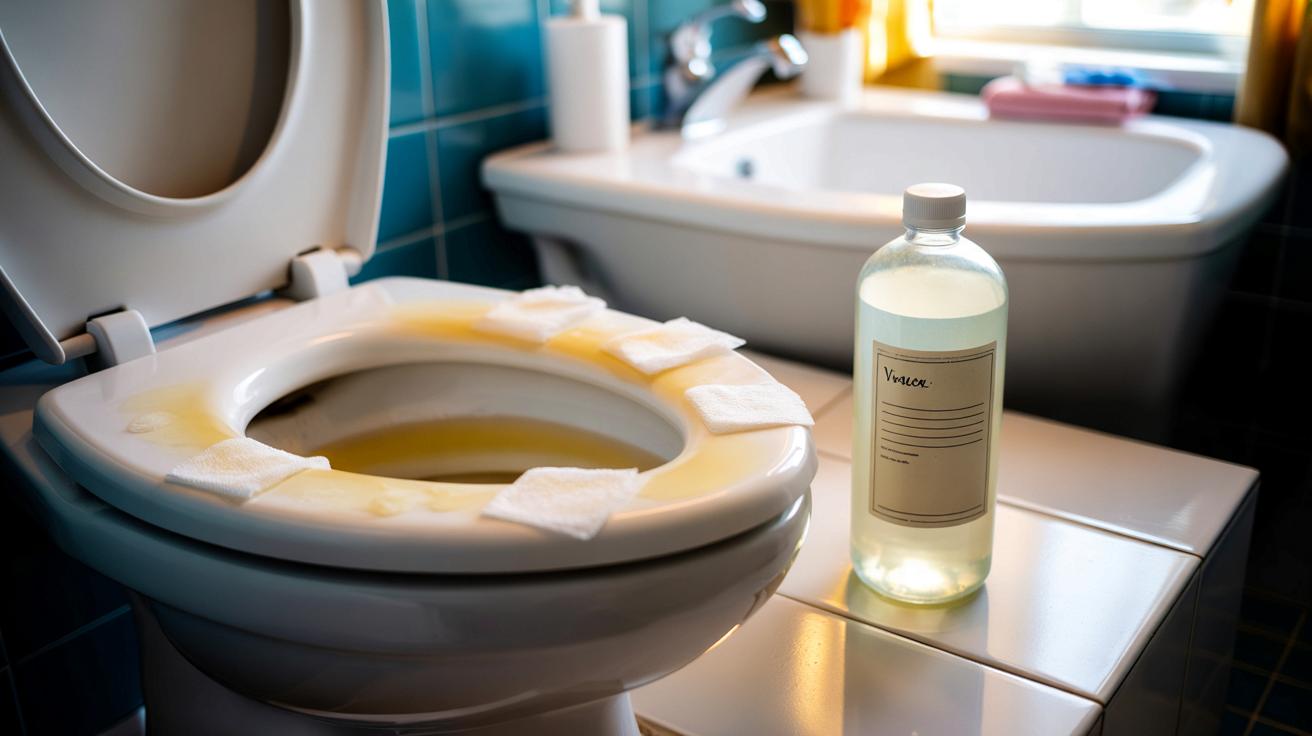
The “forgotten” liquid is plain white vinegar. Not the fancy one for salads, but that cheap, slightly sharp-smelling bottle people used to use for just about everything.
For yellowed toilet seats, it works like a quiet technician. The acetic acid in the vinegar slowly dissolves limescale, soap scum and product build-up that cling invisibly to the plastic and give it that old, tired tone. Used patiently, it brightens without burning.
*This is what most of our grandparents knew instinctively, before we filled bathroom shelves with colored gels and foamy sprays.*
Here’s a simple method that actually works.
Soak a few sheets of paper towel or thick cotton cloth with white vinegar, then lay them directly over the yellowed areas of the toilet seat. Press gently so the liquid really sticks to the surface. Leave it like that for at least one hour – two or three if the yellowing is very marked.
When you remove the paper, wipe with a damp sponge and a tiny bit of dish soap. The change is subtle at first, then surprisingly clear: the plastic looks lighter, fresher, less tired. If the seat is very old, a second session often takes it a notch further.
Let’s be honest: nobody really does this every single day. We usually wait until the problem becomes visible, almost embarrassing, and then we panic. That’s when people pour straight bleach, mix products, scrub with abrasive pads and end up damaging the surface.
With vinegar, the work is more about consistency than force. The acid is mild, so it needs time to act. What you’re doing is “lifting” thin layers of residue, not attacking the plastic itself. A quick wipe with diluted vinegar once a week keeps the yellow from coming back too fast and quietly prevents that long-term build-up you hate to see.
How to use white vinegar safely (and what not to do)
The gesture is simple and almost calming. Start by cleaning the toilet seat with a basic soapy sponge to remove surface dirt. Rinse and dry quickly. Then soak a cloth in warm white vinegar – the warmth helps it work a little faster – and lay it carefully over the yellowed areas.
You can wrap the whole seat like a compress and close the lid to keep it in place. Leave it alone for a while. No scrubbing, no rushing. After an hour or more, remove the cloth and wipe gently with a soft sponge. Rinse with clean water, then dry with a towel so the surface doesn’t stay wet and mark again.
A lot of people go wrong because they want instant results. They rub too hard with rough sponges, or they pour vinegar directly on top of bleach from earlier. That combo gives off nasty fumes and doesn’t clean better. It just overloads the air and your lungs.
There’s also the temptation to “boost” vinegar with baking soda every time. It foams, it looks powerful, but the reaction neutralizes both ingredients. Good for unblocking pipes, less useful for gentle whitening. With yellowed toilet seats, slow contact with pure white vinegar usually beats the showy tricks we see online.
Sometimes the smallest, most old-fashioned bottle solves the one problem you were ready to throw money at. A professional cleaner told me, “If people used vinegar once a week in their bathroom, half of my ‘impossible stain’ calls would disappear.”
- Use only white cleaning vinegar – not colored or flavored vinegar meant for cooking.
- Test on a hidden area first if your seat is very old or already damaged.
- Never mix vinegar with bleach or strong toilet gels – rinse between products.
- Use soft cloths or sponges, not abrasive pads that scratch the plastic.
- Repeat the treatment every few weeks to keep the seat bright rather than starting from zero each time.
Beyond the toilet seat: a small ritual of care
There’s something oddly satisfying about watching a yellowed toilet seat slowly come back to life. It’s not glamour cleaning. No one posts before-and-after photos of this on Instagram. Yet it quietly changes how you feel when you walk into your own bathroom.
That cheap bottle of vinegar can do more than brighten plastic. It descales taps, freshens the bowl, softens laundry, clears the shower head. One humble liquid that replaces several flashy products and quietly lightens the mental load of household chores. There’s a kind of sanity in that.
Maybe that’s the real story here: not just a trick to save a toilet seat, but a reminder that small, consistent gestures often beat the dramatic “deep clean” we promise ourselves and never keep. The yellow ring on the seat is just a signal. What we do next says a lot about the home we’re trying to build, day after day, behind a closed bathroom door.
| Key point | Detail | Value for the reader |
|---|---|---|
| Forgotten liquid | White vinegar dissolves limescale and residue that yellow plastic | Whiter toilet seat without buying a new one |
| Application method | Soaked cloth or paper left on the seat for 1–3 hours | Visible brightening with minimal scrubbing effort |
| Good habits | Regular light cleaning with diluted vinegar and no abrasive pads | Longer life for the seat and a bathroom that looks truly clean |
FAQ:
- Question 1Can white vinegar really fix a very yellow toilet seat?
- Answer 1It often brightens it significantly, especially if the yellowing is from limescale and product build-up. If the plastic itself has aged and changed color deeply, vinegar can improve the look but not restore it to brand new.
- Question 2How long should I leave the vinegar on the seat?
- Answer 2Between 1 and 3 hours is ideal. For light yellowing, 1 hour may be enough. For older stains, repeat the process rather than leaving it overnight every time.
- Question 3Will the smell of vinegar stay in the bathroom?
- Answer 3The smell is strong while you’re using it, but it evaporates quickly. Open a window or leave the door ajar, and the scent usually disappears within an hour.
- Question 4Is white vinegar safe for all types of toilet seats?
- Answer 4It’s generally safe for most plastic and wood-coated seats when used with a soft cloth. If your seat is cracked, very old, or made of untreated wood, test a small hidden area first.
- Question 5How often should I repeat the vinegar treatment?
- Answer 5For maintenance, a light wipe with diluted vinegar once a week helps prevent yellowing. A deeper “compress” treatment every 1–2 months keeps an older seat looking brighter for longer.