You open the oven “just to check,” and there it is. The brown crust on the glass that no sponge can touch. The sticky patch where last month’s lasagna bubbled over. The black shadow at the back that has survived every spray, every scrub, every promise on every bottle.
So you close the door again. Tell yourself you’ll tackle it this weekend. Then you don’t.
We’ve all been there, that moment when the smell of burnt fat hits you as the oven preheats and you think, “Right. This can’t go on.”
Here’s the twist: the ingredients that finally change the story are probably not the ones lining your cleaning shelf.
Why classic oven tricks keep failing you
You’ve heard the same advice on repeat: lemon steam, baking soda paste, white vinegar bath. They sound gentle, “natural”, almost spa-like for your oven. You try them, the kitchen smells fresh, but the baked-on grease is still grinning at you through the glass.
Part of the problem is fatigue. By the time you decide to tackle the oven, it’s already really bad. Those golden splashes you ignored after Sunday roast have been reheated twenty times. At that point, lemon is like bringing a butter knife to a brick wall.
Take Clara, a 38-year-old teacher who cooks almost every night. She told me she used to block out a whole Saturday morning just to face the oven. Rubber gloves, old tracksuit, bucket of hot water, the works. She’d mix baking soda and water, smear it everywhere, spray vinegar, wait.
Two hours later, she’d be on her knees, literally scraping at those caramelized black spots with a plastic spatula. The result? “It was… fine,” she said. The glass looked cloudy. The corners still had that brown halo. Worst of all, her shoulders ached more than after a week at school.
She wasn’t lazy. The method just wasn’t doing the heavy lifting for her.
That’s the hidden truth of most “miracle” oven hacks. They rely on elbow grease more than chemistry. Baking soda is mildly abrasive and slightly alkaline. Great for fresh splatters, not a superhero against carbonized fat. Lemon gives a nice smell and some acidity, but once fat has turned sticky and dark, perfume isn’t the answer.
➡️ Rodents flee instantly: the overlooked staple that drives rats away without traps
➡️ No more hair dye : the new trend that covers grey hair and makes you look younger
➡️ Neither swimming nor Pilates: experts reveal the best activity for people suffering from knee pain
➡️ The one winter fruit that keeps robins returning to your garden, according to birdwatchers
➡️ Spanish researchers show mammoths and dinosaurs were slower than we thought
➡️ State Pension Cut Approved : $ 140 Monthly Reduction Starting March
What you need is something that clings, softens, and lifts, while you mostly stand back and watch. Less scrubbing, more soaking. And here’s where two unexpected kitchen-cupboard ingredients quietly shine while lemon and baking soda take all the glory.
The two quiet heroes: shaving foam and dishwasher tablet
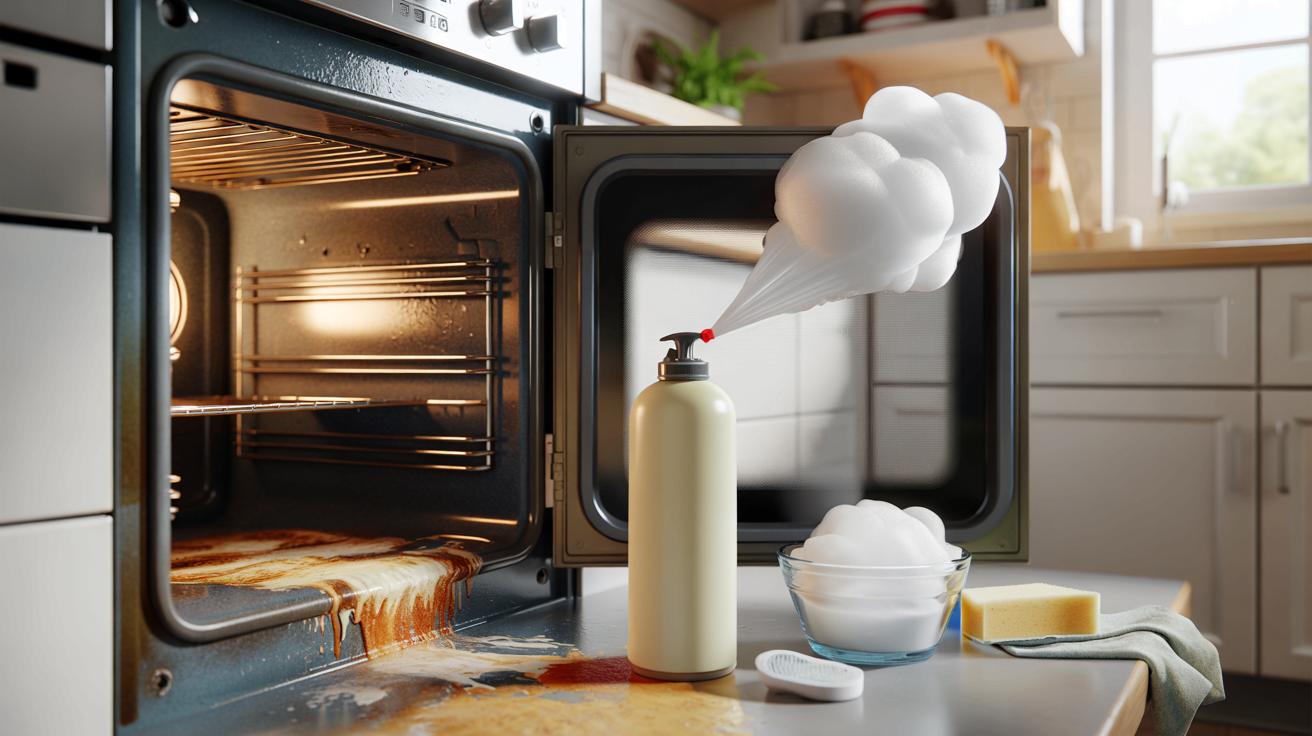
The first “what on earth?” ingredient lives in your bathroom, not your pantry: old-school white shaving foam. Not gel, not fancy blue stuff with microbeads. Just the classic, fluffy, cheap shaving foam your dad probably used.
Spray it on the cooled oven door glass and the dirtiest walls, like you’re icing a cake. A generous layer, no shyness. Then walk away. Let it sit for at least an hour, ideally two. The foam clings to the vertical surfaces and its surfactants get to work on the grease, slowly dissolving and lifting it from the enamel and glass.
When you come back, you wipe. Not scrub, wipe. And the brown comes off with a slightly shocking ease.
The second ingredient is even more surprising: a basic dishwasher tablet. Not the fancy capsule in a plastic wrap, just the solid tab itself. You’re not going to drop it straight in the oven. You’re going to “activate” it.
Fill a heatproof dish with very hot tap water, drop in the tablet, let it dissolve and cool until it’s safe to touch. Then take a soft sponge, soak it in that milky solution, and use the sponge like a magic eraser on the stubborn spots the foam didn’t fully tame. You can also rub the solid tablet gently on really crusted patches of enamel, like a chalk you slowly melt with each stroke.
This combo—foam that loosens and tablet that cuts—handles what lemon and baking soda just politely nudge.
There’s a simple logic behind this weird-sounding duo. Shaving foam is designed to soften keratin and oils on human skin and hair. That means it knows how to break down fats without being ultra-corrosive. It stays in place, which is exactly what you need on vertical oven walls. The dishwasher tablet is built to annihilate baked-on food in high heat and water. It’s packed with enzymes and powerful degreasers that target exactly the type of residue that lives in your oven.
Used carefully on enamel and glass, they act like a two-step reset button. *Let’s be honest: nobody really deep-cleans the oven every single day.* So when you finally do, you need ingredients that do the boring work for you while you drink coffee, answer emails, or scroll through recipes you might actually try in your newly clean oven.
How to use them with almost no scrubbing at all
Start with a completely cold oven. Remove racks and trays and leave them aside. Take your can of white shaving foam and spray a thick, cloud-like layer over the interior glass, especially where it’s brown or opaque. Then move to the interior sides and bottom, focusing on the darkest, stickiest splatters. Don’t flood the heating elements or fan; stay on the enamel and glass.
Close the door and let the foam sit for at least one hour. Two is better. During this time, the foam is loosening those layers you thought were “part of the oven now.” When you come back, wipe everything down with a damp microfiber cloth or an old towel. You’ll already see the first “wow” moment on the glass.
Now bring in the dishwasher tablet. For a gentle version, dissolve one tablet in a bowl of very hot water and let it cool slightly. Dip a sponge into this solution and squeeze it so it’s wet but not dripping. Then go over any remaining stains, especially corners and the back wall. Use small, circular motions.
For the “battle-hardened oven” approach, take the solid tablet in your fingers, wet it a little, and rub directly on particularly stubborn spots on enamel only, not on delicate rubber seals. Short, light strokes are enough; you’re melting the surface of the tablet onto the stain. Then wipe again with a clean, damp cloth until no residue remains. Take your time with this last pass. That’s where the shine appears.
“After years of fighting with baking soda paste, the first time I used shaving foam and a dishwasher tab, I thought, ‘This can’t be all,’” Clara told me, laughing. “I didn’t even break a sweat and the oven door looked like it did when we moved in.”
- Use only classic white shaving foamGels and colored foams often contain dyes and extra perfumes. Stick to the basic, cheap can for safer cleaning.
- Protect sensitive partsAvoid direct contact with heating elements, fans, and rubber door seals. Focus on enamel and glass surfaces only.
- Rinse more than you thinkWipe repeatedly with a clean, damp cloth to remove all foam and tablet residue before you preheat again.
- Test a small area firstEspecially if your oven is older or has special coatings. A tiny hidden corner will tell you how the surface reacts.
- Ventilate while you workOpen a window or turn on the extractor so any subtle chemical smell doesn’t linger in your kitchen.
Living with a clean oven without turning into a cleaning robot
Once you’ve seen the glass go from smoked tea to clear window with so little effort, something changes. You stop seeing the oven as a shameful, closed box and more as part of the kitchen you actually live in. The next time a lasagna overflows or cheese drips, you notice it earlier. You know you have a simple method waiting, not a three-hour battle.
For many people, this tiny shift removes a surprising amount of background guilt. No more “I really should…” every time you preheat. Just a mental note: one evening this week, twenty minutes of wiping and rinsing, done. The deep, heavy cleans become occasional, not crisis-level.
| Key point | Detail | Value for the reader |
|---|---|---|
| Unexpected ingredients | Shaving foam and dishwasher tablet replace lemon and baking soda for deep cleaning | Discover a method that actually tackles baked-on grease with less effort |
| Minimal scrubbing | Foam does the soaking, tablet solution does the cutting, you mostly wipe | Save time, energy, and avoid exhausting “on your knees” cleaning sessions |
| Simple routine | Occasional deep clean plus light wipe after big spills | Keep the oven presentable without becoming obsessed with daily maintenance |
FAQ:
- Question 1Can I use shaving gel instead of classic white shaving foam?It’s better to stick to plain white foam. Gels often contain dyes and extra additives that you don’t really want baking in your oven later.
- Question 2Is this method safe for all oven types?On most standard enamel and glass ovens, yes. Always avoid heating elements, fans, and rubber seals, and test a tiny hidden area first if you’re unsure.
- Question 3Will my food taste like chemicals afterward?If you rinse thoroughly with clean water and wipe several times, no. Run the empty oven at a high temperature for 10–15 minutes before cooking if you want extra reassurance.
- Question 4How often should I use this deep-clean method?For a home that cooks regularly, every 1–2 months is usually enough, with small wipes after big spills to prevent build-up.
- Question 5Can I use the dishwasher tablet trick on the oven racks too?Yes. You can soak the racks in very hot water with a dissolved tablet in a bathtub or large basin, then wipe and rinse for a strong degreasing effect.